Monday 30 December 2013

Happy New Year….


Hi Vintage Lovers,

WoW!!!!!
Where has this year disappeared to?
I can't believe I am writing a post for New Year already.
I have really loved having a blog and with 53 blog posts for the year I have certainly found enough to talk and write about.
Although that has never been a problem for me!!
Have nooooo fear the Gilt Edged Vintage Blog will definitely continue in 2014, with lots more of what I love - Vintage, Vintage and more Vintage! Thanks to each and every one of you for popping in to see my going's on with my vintage antics as well as all your comments and emails, it certainly makes my day!
 
As for New Year's Resolutions, I don't tend to do them. Actually I have never have taken it all that seriously. 
There are a few things I try to do every year though - Be Happy & Do the Things that Make You Happy, Follow your Dreams & Passion, Go Some Place You Have Never Been Before, Be Kind, Smile and Laugh Often, Enjoy the Little Things, Spend Time With Your Loved Ones, Shine & Be Ridiculously Amazing On a Daily Basis.
Life is Far Toooooo Short!!!!!
 
You know all those things you have always wanted to do?
You should go do them.
 
Have an amazing year......
Mel xx


Friday 27 December 2013

Gingerbread House Recipe

Here is the Gingerbread House recipe as promised.


I use this recipe when I make both my traditional Christmas gingerbread stars as well as the gingerbread men.

Gingerbread House

1/6 cup Margarine
1/2 cup Brown Sugar
3/4 cup Golden Syrup
1/3 cup Cold Water
3 cups Plain Flour
1/2 cup Self Raising Flour
1/2 tspn mixed spice
1/2 tspn ginger
1/2 tspn cloves
1/2 tspn cinnamon

1. Preheat oven to 180C.
2.Mix through ingredients thoroughly.
3. Knead the mixture into a ball. Lightly flour a board and knead the mixture until it is smooth without any cracks.
4. Roll it out until it is about 1/2cm thick. Using biscuit cutters, cut the dough into shapes and place them on a foil covered tray.
 5. Bake for about 10 - 15 minutes or until golden brown.
6. When cool, ice and decorate.


Gingerbread House Icing Recipe

2 cups of icing sugar
1/2 tspn of lemon juice
1 egg white

1. Whisk the egg white and lemon juice together
2. Add the icing sugar and mix thoroughly until quite firm.

You will need two batches of the icing for the gingerbread house. One batch to put the house together (you need quite a lot on each piece as well as holding it for a few minutes until it sets) and the other to stick the lollies to the house. You can also use this icing to decorate the traditional stars or gingerbread men if you use a piping bag.

Enjoy.
Mel xx


Tuesday 24 December 2013


Merry Christmas
Hi Vintage Lovers,


Santa is nearly here.....Our Santa sacks are ready and the Santa letters are written. There is milk, bickies and chocolates (along with carrots) on the kitchen table waiting. The jobs are all finished, presents all wrapped, and the kids are now tucked up in bed.
 
We are having Christmas lunch at home tomorrow, then we are making our way down to my brothers for dinner. I am soooooo looking forward to having our first Christmas at our gorgeous Old Lady. Homemade pizzas are on the menu. With berrymisu for dessert. YUM !!! Can't Wait !!!!!
 
Have your self a merry little Christmas.......
Mel xx


Monday 23 December 2013

Christmas Baking.....

Hi Vintage Lovers,
 
Our Old Lady is smelling rather delicious right now.

I have been baking all afternoon, shortbread and gingerbread of course. Our Christmas just isn't right without the smell of shortbread and gingerbread wafting though the house. Christmas is literally in the air.

 
In addition to my traditional stars I have decided to try making gingerbread houses with the kids, to eat for morning tea on Christmas day.


Once we got the hang of the building process everyone had great fun...


... but the decorating was definitely the highlight!
 I don't think many of the lollies actually made it onto the house!

 
Here is the final result...

 
...proudly looked upon by the little bakers.
 

The only problem now is the tedious wait until the Christmas day tasting!

Mel xx

P.S. My shortbread recipe is already on the baking tab on my blog if you would like to try it. I will put the gingerbread house recipe on the blog for you soon. J


Saturday 14 December 2013

Christmas Decorations for Our Old Lady…

Hi Vintage Lovers,


Welcome to The Old Croft at Christmas Time!

 
 Over the last few weeks we have been busy decorating our old lady ready for Santa's arrival; nothing over the top (I try to keep it simple) but perfect for us.


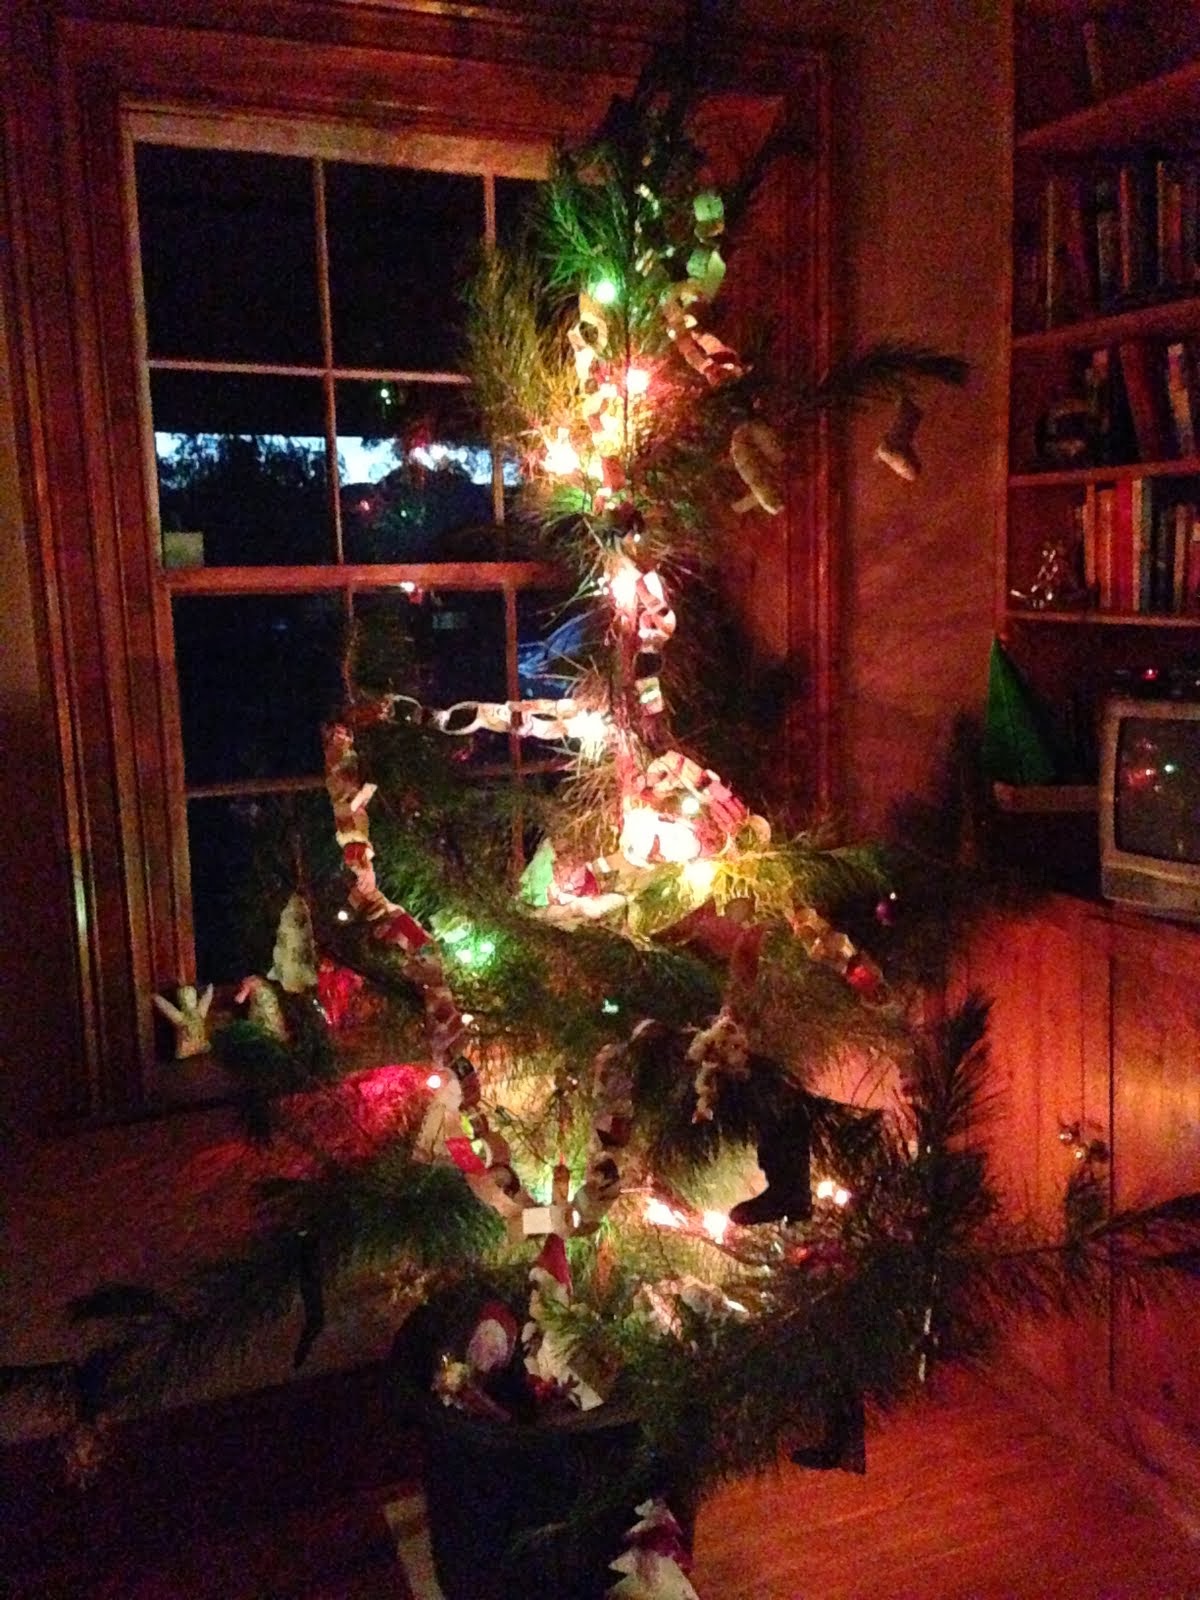
Our Christmas Tree is in our front lounge room so that it can be seen from out on the street as people wander by.
I love seeing Christmas trees in windows. As kids we always had a competition to see who could count the most Christmas trees in windows.
 
 
 Our tree is living (I couldn't ever bring myself to have a fake one, it wouldn't seem right) and we have it decorated with all the kids ornaments that they have made at kindy and school. Which makes it so much more meaningful. The kids have even made paper chains (out of old Xmas cards) that we have instead of tinsel. The only bought item on our tree are the lights!

 
 The kids also made a paper chain (out of old cards again) for our advent calendar. Each of them wrote a special Christmas message on each one that we read out.........
 
 
 .......before we have a homemade chocolate.
Yum!

 
Our Santa Sacks have made their way to our kitchen fireplace.
The perfect spot for them, waiting for Santa to fill them.


I have also filled our Old Lady with candles.
Which looks so magical when they are all lit.
 

Santa has even made his way to our table and looks picture-perfect with tea lights surrounding him.

 
So, there's quick tour of our festive decorating for our Old Lady.
Simple yet Effective, but also Inexpensive.
Because Christmas comes from Heart, not from the Store.
I hope you enjoyed your tour.

Mel xx


Saturday 30 November 2013

 Christmas 2013 is here……
Hi Vintage Lovers,

 I ABSOLUTELY LOVE CHRISTMAS TIME
It is the most wonderful time of year.
But I am the type of girl that waits till the 1st of December,
then it is CHRISTMAS. BRING IT ON.....
 
Santa, Elves, Reindeers, a sack of gifts and the true magic of Christmas.
Decorating, Baking and being with Family and Friends.
 
Christmas is not something that is bought in a store, or found under the tree. Christmas is magic, a spirit, and it is found in your heart...and not in your wallet or purse.
 
Soooooo, I have a challenge for you all if you would like to accept (that I try to do every year).
 
Really think about the person you are buying for this Christmas season:
 
Instead of purchasing a "cheap, mass produced, barcoded, made in Taiwan or China" present; that really only tells them that you didn't put a lot of time and thought into their gift.
 
I understand it is not always possible, but instead, try and find that unique and individual gift that tells them how well you know them. Show them that you put a lot of time and thought into it and that they really mean a lot to you and that you love them.
 
If you are anything like me you will be doing the latter, and finding that unique and individual gift to suit your loved one.
 
I also try to shop locally and support small business wherever possible.
Oh, and try to keep away from barcodes.  Eeeeek !!!!!!
Mel xx

P.S.  When you stop believing in Santa Claus you get socks and underwear in your Santa Sacks.
J


Saturday 23 November 2013


Moving In and an Open Pantry………
Hi Vintage Lovers,

A big Sorry, It's been a few weeks between posts.....
we have been rather busy around here and not taking it easy.....anything but!!!
 
 
After Agatha (I am smitten with her) arriving a few weeks ago we have been making the most of having an oven again and doing lots of cooking and baking. I cooked my first batch of shortbread in her last week. Lets just say they were delicious and disappeared very quickly.

 
We have also moved our leadlight cabinet into the kitchen and unpacked all of our kitchen bits and pieces. Everything has fitted in perfectly, like it was meant to be......although I did have a big cleanout and did take quite few bags to Goodwill.
It is amazing how much you collect.....without even trying!!!


We then had a decision to make.......what to do with the old kitchen window cavity that the previous owners had made in to a pantry (with doors).
We have been deciding which doors to pop back on that will suit the kitchen as we are planning to change the cupboard doors on the kitchen bench now also (they are just tounge and groove timber). 


I then had a thought - why don't we have an open pantry and make a feature out of the old window cavity instead of trying to hide it away.

 
We then attached matching architrave moulding (the same as the old door frames in the kitchen), sanded it down and stained and varnished.......and here is the outcome........
 
 
........We couldn't be happier with the result.
It matches the kitchen perfectly.
  I have a spot to display all my old tins and also an excuse to buy more old kitchen tins to pop food into to hide the modern packing.
 
 
Hope you are having a fabulous weekend.
 

Mel xx


Wednesday 6 November 2013


Agatha’s Home for good…….
Hi Vintage Lovers,

The day finally arrived yesterday, I feel like I have been waiting forever, when Agatha came home for keeps and I couldn't be happier. It has been about six months in the planning and waiting (she spent four months on a ship traveling from our Mother England). I never do anything by halves!!!! I am one of these people that never take the easy option and visit a Harvey Norman or Ikea store. I haven't even ventured through their doors at all and have NOOOO plans to in the near or distant future!!
 
For those of you that are new to the blog Agatha is our new Aga stove. Who has travel half way across the world to be with us and I couldn't be happier now that she is sitting in our heart of the home. Yes, I name non living items in our home. I am a little unconventional or maybe unique and eccentric would be better words to describe me. J
 
 
We had the house full yesterday with all the tradies. Wayne had the day off of work, then we had the Aga Store guy and our electrician and plumber here also. A full house for most of the day. Wayne jokingly said to me last night that he now knows what I do all day now - have Cuppas and Tim Tams and long morning tea sessions with all the tradies that we have had at our Old Lady over the past six months!
The cheek of him!!! Or maybe he knows me oh so well, I love a good cuppa and a chin wag!


Agatha is gorgeous and looks perfect in our kitchen.
 As soon as she was unpacked yesterday, we knew we had made the right decision, and all the planning and waiting had been all worth while. She has two electric ovens and four gas hobs which is perfect for what we want.


We cooked a potato and leek soup last night. I know it's not a gourmet meal as it is mid week, but very yummy none the less. That will have to wait until the weekend as our youngest has cricket training and I have yoga tonight and then tomorrow night we have an under 10's cricket match to go to and support.


I am Soooooo looking forward to also doing some baking. I have missed it and can't wait to get back into it. One of my plans for over the weekend.


Hope you are having a great week.
Mel xx

P.S. I am now on Instagram, I would love you to pop over and have a look. I have popped a link to my instagram page on the side of blog for future reference. It's a great way to follow along between posts. Click here, if you would like to have a peek at it. J


Monday 21 October 2013


Two and a bit weeks to go….

Hi Vintage Lovers,

The last few weeks have flown by and I know it's been a couple of weeks between posts.
So here is a bit of an update......
 
Last weekend we went away for a few days just to catch up on some sleep, take it easy, and see everyone back home.
We had a fantastic time but it's now time to get back to all the jobs and there will be a few over the next few weeks. We are having a cleanup and taking a few loads to the dump, the work in the garden will be continuing, as well as finishing some final bits and pieces in the kitchen before our stove arrives.
 
 
Agatha (our stove) is due home on the 6th November !!!!! Yay!!!!
As you can guess I am just a little bit excited.
Only two and a bit weeks to go!!!!
 

So, there are plenty of little jobs to do before then.
The staining of the skirting boards being one of them,
that was last weekends job.


After planting the Irises (I have trimmed them now so they look a little different after the last photo of them) the other weekend, I have been planning the next stage of the garden bed.


I am going to create another garden bed around the Irises with a rosemary hedge that will highlight the store house and Irises. Down near the new shed I was thinking of planting a pittosporum hedge to hide it.


I then decided that my two iron gates would look fantastic in the garden bed as well. One at the front of the store house and the other at the back between the store house and the new shed.


Sooooo.........after poisoning the grass over the weekend and grabbing some rosemary clippings from Mum and Dad today and potting them up this afternoon. The garden bed is well and truly under way.
 
Hope you are having fabulous week.
 
Mel xx


Tuesday 8 October 2013


A "How to attach Skirting Boards" Tutorial

Here is the tutorial on "How to" attach skirting boards as promised.

1) Cut the end of the skirting that fits into the corner at 45 degrees. Measure the length required and cut to fit.


2) Pre drill the nail holes to prevent the timber from splitting. Use a drill size approximately half the diameter of the nails to be used.
 
 
3) Sit the skirting board in place and gently tap the nails into the plaster wall to mark the position of the plugs.
 
 
4) Circle the nail marks with a pen or pencil to avoid losing your place and drilling in the wrong position.
 
 
5) Drill to the required depth using a masonry bit on the "Hammer" setting. The depth is easy to set by pre measuring and marking on the drill bit using tape. 

  
6) Remove as much dust as possible from the hole.

 
7) Measure, cut and taper the ends of the dowel plugs. 


8) Hammer the dowel plugs into the wall ensuring a firm (but not too tight) fit. Liquid nails can be used if the fit is a little too loose.

 
9) Sit the skirting board in position and hammer the nails into the dowel plugs until just the head of the nail remains.
 
 
10) Using a nail punch, bury the nail head of the nail about 2-3mm below the surface of the skirting board.

 
11) Cut the matching skirting board and repeat the process. 


 I hope this tutorial is helpful and has given you a few tips as working with old houses can be tricky sometimes, but certainly not impossible and well worth the extra effort.
Mel xx
P.S. I have created a 'how to/tutorial' tab on the blog for future reference. J